 |
| Jocelyn and I on the Potomac River |
 |
| Kayak Tattoo |
|
| Jocelyn and I on the Potomac River |
|
| Kayak Tattoo |
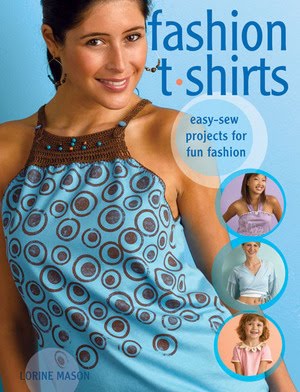 I have since been dyeing T shirts, cutting them into strips and creating all kinds of jewelry pieces. It is so much fun as you never quite know what you are going to get until you are finished. Here is a very basic design I did with the idea that it would be fun one for a girl scout troop or frankly any group of girls to get together and try. It is basic braiding and then a wrapping technique with a pony bead slide closure. Simply put it is bright, fun and inexpensive.
 I would love to hear your thoughts on this simple design - it opens the door to so many other possibilities that I find it hard to 'stay the line' so to speak with my other deadlines. Oh well, I guess that is price one pays for being creative.
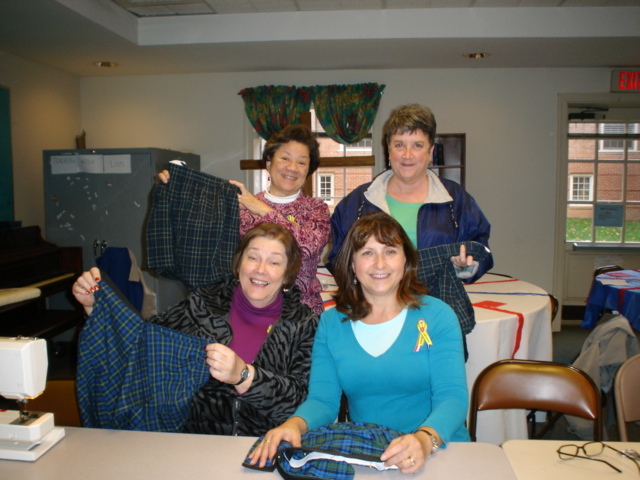 It was sew simple to convince three members from my local American Sewing Guild to accompany me to a Veteran's Day Sewing Workshop held in nearby Fairfax, Virginia. Seen here are Barb H., Ruth L., and Barbara D. That's me wearing a yellow ribbon.
 Our wonderful, Sew Much Comfort instructor and coordinator Lynne T. She was very patient with us as she explained in great detail every step of the process to adapt simple boxer shorts to fit over the bulky medical equipment necessary for the proper healing of broken or missing limbs.

 Velcro was generous to donate three boxes of their wonderful product, which is used in each clothing item. As you can imagine we used a lot of Velcro throughout the day. Thanks Velcro - it really made a difference.
 It is so funny how things come about. I was with good friend Eileen Hull last week and she mentioned the upcoming 'suitcase' project for the Fresh Vintage bloghop. I had participated the previous week and was not planning on going another round of hopping but since my new book, Love to Dress Up 18" Dolls, was just released and would be the perfect fit for the suitcase, I thought it was a wonderful fit. I decided to dress my doll in the Outdoor Explorer outfit which went perfectly with some Monarch butterfly fabric I already owned in my stash.
  Here is how I created my suitcase so full of butterflies, that some seem to be escaping.
  If you would have asked me a few years back if I could possibly make a living writing books about doll clothes, I would have laughed. Yes; it is true that I was one of those children who created clothing for my one doll out of old socks, old clothes, even fashioning a costume made out of leaves and sticks one time but paying bills while playing with fabric and dolls. No way..... It just goes to show that if you can think to imagine it - you can make it happen. Of course designing clothes for dolls is not the only item I work on at a time but my new book brings the total to seven pattern packs and three books on doll clothes. You can imagine I have quite the collection of clothes at this point and with no grandchildren or small children in my life at this moment I am quite the hit with my friend's children. My last Christmas party involved bringing out a box of dolls and a wide variety of clothes and the three youngsters attending the party were totally involved in dressing and undressing the dolls. What a life!
 Here is my latest example of all things possible. As a little girl with a sister a couple of years younger living on a farm we had to improvise our craft supplies. Trust me there was no Michaels or AC Moore down the road and frankly there was no extra money for purchasing fun supplies anyway. This did not stop the creativity in our household. We used things from the yard, recycled items (before recycling was popular) and flour and water for glue. I like to think of myself as a child-like version of MacGyver of the crafting world. Anyway, the point is that we made shoes from cardboard and bailer twine. We carefully traced the outline of our feet onto the cardboard, cut them out and then strung up a version of a farmer flip flop. We decorated them and then proceeded to have a fashion show, laughing ourselves silly each time we had to stop to re-string our footwear. What a memory!
 Be Inspired is a Canadian Designer Look & Learn event scheduled to be held at the CHA show in Chicago, July 18th, 2011. A total of eight Canadian designers were asked to create a mixed media piece using supplies provided by; DecoArt, Harmonie, Canvas Corp, and last but certainly not least Tsukineko. While each designer was supplied with the same wonderful mix of products the finished projects will showcase the individual designers look and style. Designers will be on hand to discuss their creations with Retailers from around the world at a Look and Learn event at the show. Looking to encourage retailers to recognise Canadian designers and manufacturers, each attendee at the event will not only receive instructions for each project on a CD but an inspiration kit filled with products valued at over $150. Let us inspire you .... to inspire sales.

 I attended a couple of classes recently while down at the Hampton Roads quiltfest and decided this week that I refuse to have yet another unfinished project hanging around my studio staring me down every time I walk through the doors.
 It was a complete hoot - lots of fun. My only worry is that the listeners were not as entertained as I was during the show. We'll see if I am asked back I guess. Anyway I promised Pat as well as my readers on the Sewing Savvy e-newsletter I would post more recycled sewing projects so I better get busy. If you have a few minutes listen to the show. I am the first guest - don't be alarmed by the advertisement when you first hit the play button - I guess they have to pay the bills somehow - it only takes a moment and then Pat is heard introducing me. Remember I am a novice at this so please be kind.
