Wednesday, January 4, 2012
Sunday, December 4, 2011
A Challenge called 'Sock Monkey'
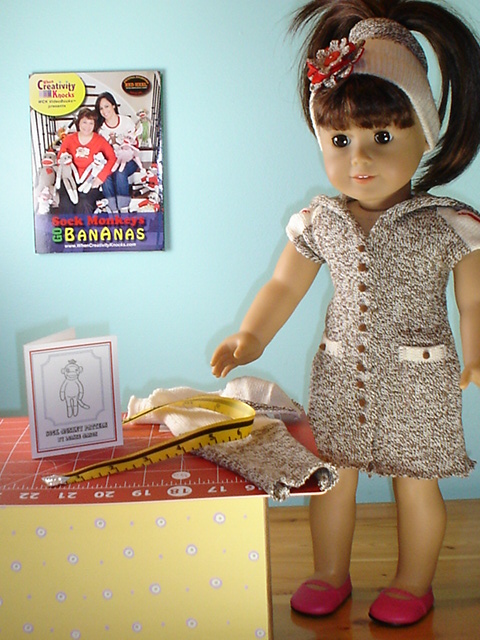
 When asked to participate in the 'Sock Monkey Challenge' I was at first perplexed as to a possible design direction. My younger brother, Fred carried around a sock monkey when we were growing up so I was quite familiar with the concept of a monkey made from a work sock but the real challenge would be in putting my creative stamp on the project. And then, it came to me. I recently turned in my fourth manuscript for a doll clothes book and decided this is how I would participate while remaining true to my business plan. May I introduce Millie, she is 18" tall and has a knack for creating sewing projects from just about anything. A red heeled work sock from Fox River was the perfect fabric for her trendy sweater dress and hair band. In this photo Millie is preparing to film 'The sock monkey challenge' for u-tube.
 The stage is set and once the lighting is checked the work will begin. We would like to send out a great big Thank You to the folks at When Creativity Knocks, Fox River and Judikins, the wonderful sponsors of filming today.
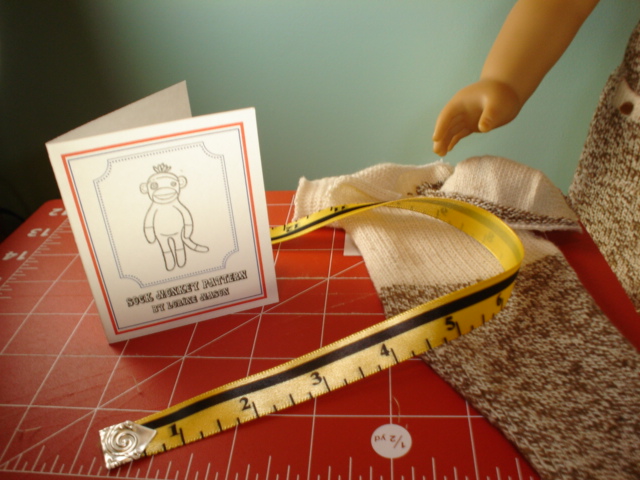 A closeup of the pattern envelope which was inspired by a Judikins stamp along with some of the tools necessary to create your very own sock monkey. If you would like to make a people sized sock monkey for someone you love, check out the video/pattern combination offered by When Creativity Knocks.
 Hey Readers: Did you know that you can enter the contest:-Go to http://www.whencreativityknocks.com/ website-In the Member Log in box click: Create An Account-Entry Code: Sock Monkey There is also a discount coupon to purchase the WCK VideoBook: Sock Monkey Goes BanAnas
Please note: Rit Dye provided product for this project however Millie chose to feature their wonderful products in an upcoming post entitled "T Shirts and your Jewelry Box" coming soon on It's Sew Lorine.
Thursday, December 1, 2011
Mason Creation Stamp Set

My good friend who happens to be a very talented designer among other things, created a beautiful card project using a few of my Mason Creation Stamps. Lisa Rojas is her name and I am honored to call her friend. She is referred to as The Stamping Queen and after checking out her blog you will know why. Simply click on her name and you will arrive at the place for creative musings presented by the Queen herself. The project called Home Blessing is being featured on the Crafts n Things website right now. Check it out at : http://www.craftsnthings.com/Projects/BonusProjects/201202/HomeBlessing.pdf
Thursday, November 17, 2011
Creating One of Kind Gifts for Friends and Family
 An inexpensive frame - around $5, leftover pieces of fabric and a little sewing. Viola, you have a one of kind gift for someone you treasure. The instructions and inspiration are located in the Sewing Savvy eNewsletter I write for Clotilde.com every three weeks. This particular post will be active on November 16th....check it out and perhaps sign up for future newsletters. It's absolutely FREE! ......
Monday, November 14, 2011
American Patchwork and Quilting Radio

"Lorine Mason, featured guest on American Patchwork and Quilting Radio with Pat Sloan."
Tune in this afternoon November 14th at 4:00 pm est. I willl be talking with Pat and it is always a pleasure as this lady has a sense of humor along with all that talent. I am looking forward to discussing my love of fat quarters of fabric, Boutique Slippers, all those doll clothes books, creating fun projects for publishing and who knows what else. Here is the link to tune in... http://www.allpeoplequilt.com/radio/index.html
Tune in this afternoon November 14th at 4:00 pm est. I willl be talking with Pat and it is always a pleasure as this lady has a sense of humor along with all that talent. I am looking forward to discussing my love of fat quarters of fabric, Boutique Slippers, all those doll clothes books, creating fun projects for publishing and who knows what else. Here is the link to tune in... http://www.allpeoplequilt.com/radio/index.html
Friday, November 11, 2011
Sew Much Comfort - Veteran's Day Sewing Workshop
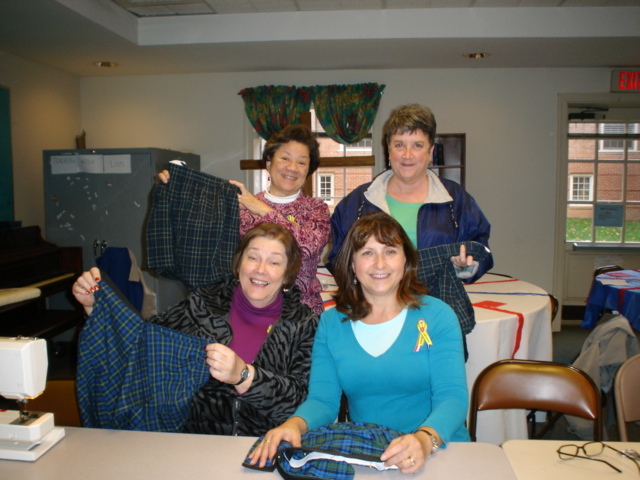 It was sew simple to convince three members from my local American Sewing Guild to accompany me to a Veteran's Day Sewing Workshop held in nearby Fairfax, Virginia. Seen here are Barb H., Ruth L., and Barbara D. That's me wearing a yellow ribbon.
 Our wonderful, Sew Much Comfort instructor and coordinator Lynne T. She was very patient with us as she explained in great detail every step of the process to adapt simple boxer shorts to fit over the bulky medical equipment necessary for the proper healing of broken or missing limbs.
We were all very intent in doing it right so concentration was a must. I think Lynne thought we were good students. Quality is a must and adhering to the proper way - The Sew Much Comfort Way - if you will, was very important.

Here is the entire group of ladies, with me in the middle once again. Oops not the entire group- we are missing one lady - she acted at our quality control person and took the photo. She inspected each pair before they received a label and were ready for delivery to Walter Reed Hospital.
 Velcro was generous to donate three boxes of their wonderful product, which is used in each clothing item. As you can imagine we used a lot of Velcro throughout the day. Thanks Velcro - it really made a difference.
We were also helped by Westcott, who donated three pairs of scissors for the event. Having a sharp pair of scissors handy is a must whenever you are sewing and Westcott makes great scissors. Thanks Westcott.
Monday, November 7, 2011
Quick Stitched Ornaments
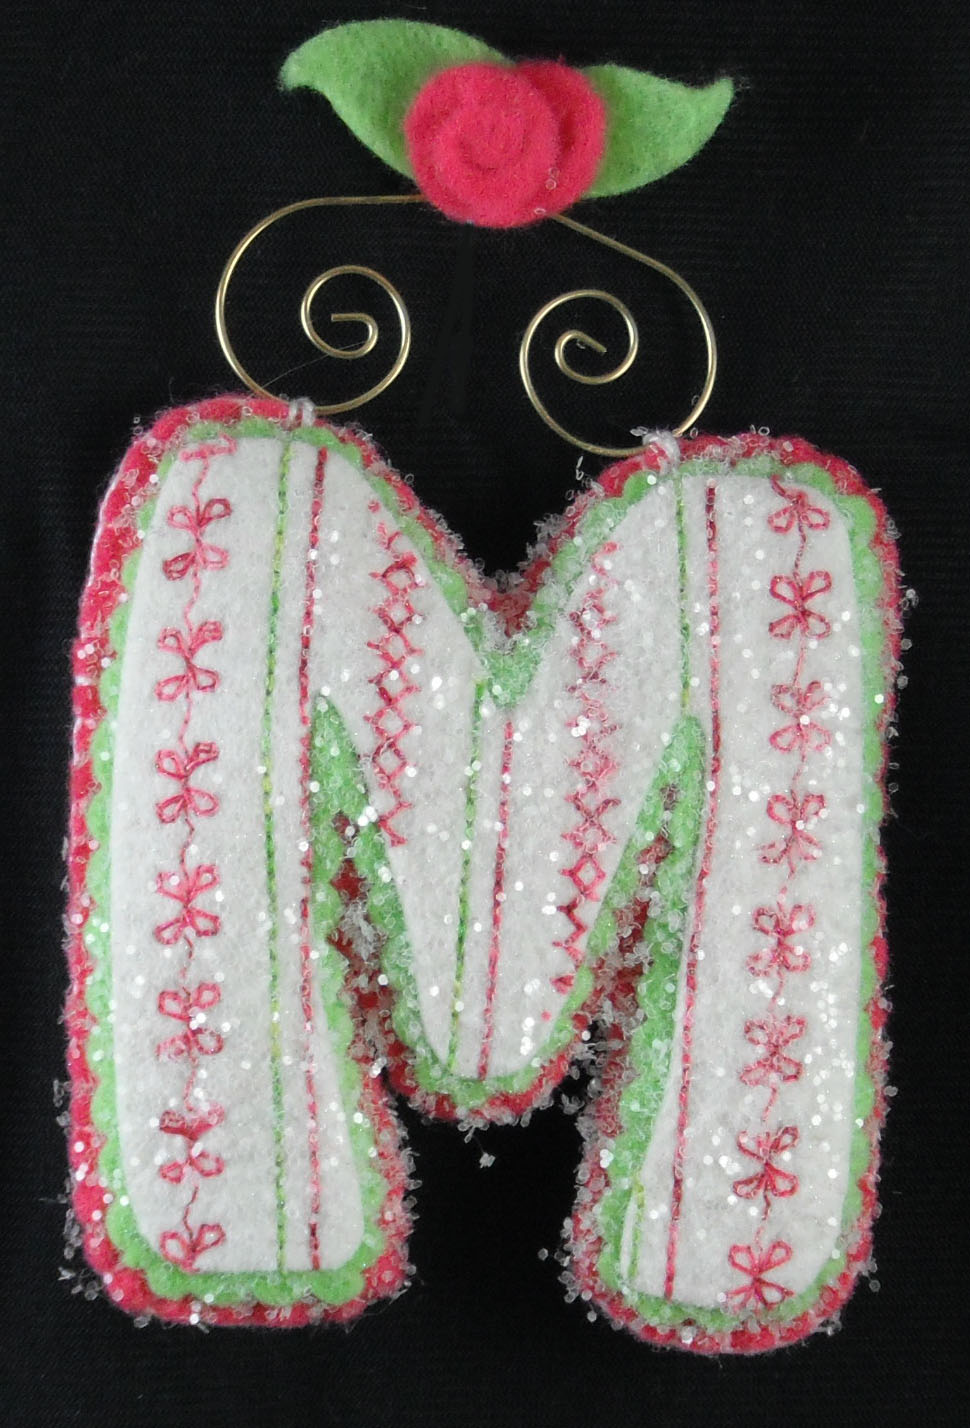 M is for Mason or Mom or Mary, the choice is really yours to make. This is a quick ornament to make with only felt, stuffing, a hanger and your sewing machine. If you would like the crystal look add some glitter to the finished design. How did I create these adorable ornaments.......
 Well let's see, first of all I chose my favorite stitching patterns on my sewing machine and stitched rows spaced app. 1/2 inch apart onto a piece of white wool blend felt. I used a variegated thread for added interest. I then fused Steam a Seam 2 to the back of the stitched piece of felt.
 Next I chose a shape for my ornament; a letter created from a font on my computer that I expanded to a suitable size, a cookie cutter, or perhaps something hand drawn.
I traced the 'shape' onto the felt and cut around the image. I removed the paper backing and fused the shape onto a second color of felt which had also been backed with fusible web. I used a scalloped blade scissors to cut around the shape leaving a 1/8 inch border.
 I then fused the scalloped edge felt to a final color of felt and trimmed around the edge leaving a 1/8 inch border. I cut a second piece of felt for the backing.
 Stitch the two layers together using your machine or a needle and thread and a blanket stitch, being sure to leave a 1 inch opening to stuff the ornament.
Stuff the ornament and sew the opening closed.
Attach a hanger using felt tabs or by sewing it directly to the top of the ornmant. Add a felt rose and leaves to the top of the hanging loop and sprinkle with glitter, if desired.
Enjoy!
Subscribe to:
Posts (Atom)