Friday, July 6, 2012

Teaching our children to sew

Sew Fun Tote Box
I feel the ability to sew is part of my personality - I am creative and I love fabric! It saddens me to think the art of sewing might be lost if schools do not continue offering classes to their students. Not every household has a sewing machine and in some cases they might have the machine but no interest  or the time to teach the children of the household. This is where the school system or the community can step up to the plate so to speak. If you love sewing, why not offer a class at your neighborhood sewing store, in your church basement or perhaps even in your home, keeping the class to one or two interested children.

I recently wrote an article for the Sewing Savvy e-newsletter about sewing with your tweens and teens.I created a quick Tote project that I thought might be a great starting point for new sewers as it is made from two fat quarters of fabric and involves a number of basic sewing skills that they can practice while completing a wonderful project to take home. The base of the tote is created from a cereal box which adds wonderful stability and can be changed out whenever you feel it is necessary. Sewing can be fun but to keep it fun, it really is all about the fabric and the finished project. If it is not visually interesting you have lost most teens before they have even started. To check out the project above along with full instructions read my latest Sewing Savvy e-newsletter. The instructions and pattern diagrams can be printed direct from the newsletter, making it sew easy. I would love to hear your comments.

Lorine

Monday, July 2, 2012

Duetica & House Warming Gift

Finished Design

I recently acquired the membership to the Duetica Lettering Arts Studio which was recommended to me by my good friend, Eileen Hull. After talking with Mark and Adrienne at Duetica I was sold on the concept and will become one of their guest bloggers as I like the system enough to recommend it on my own. The Duetica Lettering Arts Studio provides for a very low cost access to numerous custom designed fonts and the ability to work between not only different fonts and sizes but each font comes in a variety of combinations that all seamless fit together.
This is the first project I created using the system the first time out of the gate so to speak. Here is how I created this fun pillow which I intend to give a housewarming gift to my daughter .

Tracing the Design onto your fabric.
I started by choosing what I wanted to transfer onto the pillow front. I chose to use their initials as the kMn & kNm were kind of unusual. I selected the Woodwinds font and quickly tabbed through multiple versions of lettering styles within the system. I enlarged the font to 230 and printed out the 3 sheets of paper. I then used a light table to trace the lettering onto my fabric using a pencil.
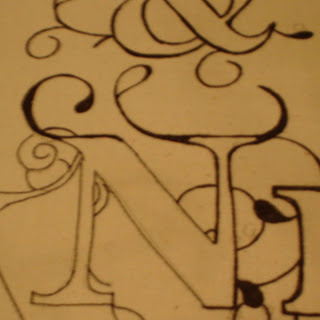
Adding weight to the Linework
 The next step was to use a Sharpie fine marker and trace around the lettering filling in the lines here and there and varying the width of the stroke. I used a piece of copy paper which I laid over the ink and pressed using a hot iron with no steam. The ink is now set.
Painting in Designs
The next step is to paint in the center of the letters. I used Tumble Dye by S.E.I to paint in the letters. I combined fuchsia, pink and yellow to achieve the coloring you see on the pillow front. While the ink does not act as a full resist, I found that I could carefully brush in the paint right next to the ink allowing only a small space for the ink to flow and had no problems. S.E.I. has a great tutorial on their website, check it out.

Once you have completed your line work, painting and have heat set the inks and dyes it is time to create your pillow. There are many ways to make a pillow and sometimes simple is the way to go. For a detailed explanation of making your own pillow I suggest to go over to the Fairfield site as I have instructions along with some other great designers on exactly where to start and how to finish your own pillow.
Thanks for dropping by and be sure to check out Duetica, Fairfield and S.E.I to see what you can do.

Monday, June 11, 2012

Doll Clothes Book Author?


A sneak peek at a trio of the designs from a latest book

I never imagined myself as the author of five books and seven patterns all about doll clothes. Why not, I must ask myself however as I was one of those kids that preferred at times to stay home and  create something from scraps of fabric, yarn and cardboard as apposed to running off to a pick up game of baseball like my sister. One of my favorite activities involved cutting up the old Eaton's catalogue. I would only get one after the new issue was received and okay-ed my Mother, but when I did I made good use of it. I carefully cut out people, fashions, furniture, appliances and more from the pages and then glued them to cardboard, creating a complete household filled with family.
My first set of patterns
How did I get started in the doll clothes business you might ask? Well, I was creating and selling designs too DRG, House of White Birches and Annie's Attic and the buyer for the Clotilde catalog asked if I might be interested in designing doll clothes for a doll they were selling in their catalog. I had never done that but thought that it certainly could not be much different that designing, drawing patterns, writing instructions so why not give it a try. Well after years of stuffing patterns into plastic envelopes to fill orders I can say it is possible and I did it. 
My first book on doll clothes

The patterns sold quite well and I was on my way to becoming a doll dresser of sorts. Next step was that I was asked if I would be interested in designing clothes for the popular 18 inch doll. Once again after a little research and asking myself why not I jumped in with two feet and a sewing machine. I decided quite quickly that I needed something to make my books a little different. That difference was born through my concept of every outfit must be able to be constructed from a fat quarter of fabric. I wanted to make things as simple as possible and not having to stand in line at the fabric cutting table was the answer. 
My latest book

I have written three books using the 18 inch doll as my base and each has done quite well I am proud to report. My latest book however takes me right back to my doll clothes dressing roots as it is for the Lots to Love® dolls where I started. This latest book is not available just yet but will be very soon. 

I guess that is the story in a nutshell, it is funny where life takes us.....

Lorine

Monday, June 4, 2012

Family Vacations & Picnics

Family Vacations Canvas by Lorine Mason
Family vacations for my husband, our two daughters and myself centered around camping and visiting relatives once we moved away from everyone. One place we returned to over and over again was a campground called Pancake Bay which is actually a provincial park in Ontario. It was almost halfway for all concerned and we were able to camp directly next to the lakefront. It was a wonderful experience, that we were lucky enough to repeat for three years. 
I created this canvas as a Father's Day gift for my husband to hang in his home office. 
I painted a 14 x 16 inch canvas and decoupaged two pieces of scrap booking paper to the front. I then cut three opening through the canvas and decoupaged papers for my pictures to peek through. Cutting down the middle of the intended openings allowed me to roll back the edges of the canvas to create the windows. With the addition of some paper weaving and single accent strips the canvas was almost complete. I did not want to add a frame so I glued twine over the frames' sides to finish. Viola - a handmade tribute to camping, family and most of all Dads'.


DAD: Thanks for all you did and who you were.  
Henry Adam Schlamp November 1923 - May 2012   
Love Lorine          

Saturday, May 26, 2012

Sullivans, The Cutting Edge Video

The Sullivans Book Project

I recently posted a video to YouTube where I demonstrate the  Sullivans, The Cutting Edge cutting system while creating a paper project. I am not known for my paper projects however have sold many designs before focusing my energy and design skills to the fabric arts. This however was a good fit as I am very familiar with a rotary cutter, cutting mat and ruler system, having used them for years in my fabric projects. I quickly came up with a project and filmed the video.
The main reason I was interested in the video project was that Sullivans, The Cutting Edge offers a unique twist to the traditional three part cutting system. Each of the rulers comes with an embedded sharpening blade along its edge. As you  run the rotary cutter along the ruler it sharpens the blade. This is a wonderful for a couple of reasons, #1 it saves money as replacing dull blades can be expensive and #2 we now have the ability to change between fabric and paper without worrying about dulling our blades. With the Mixed Media craze right now, crossing between the two mediums does not require separate tools. Anyone who works with fabric has had the talk with their family members. Do Not Touch my cutting tools. There was no excuse great enough to get a pass on this one. I will admit now that I have discovered this system and the ability to cross between mediums the rules have not changed in my house. Why change the rules mid way through the game.
I will be posting the complete instructions for the book project very soon. In the meantime please check out the video, I would love to hear your thoughts.
www.youtube.com/watch?v=XhgMlEPf6sg


Monday, May 14, 2012

Urban Doodles & Kayaking

Jocelyn and I on the Potomac River
 Yesterday was Mother's Day and I was fortunate enough to be able to go kayaking with my daughter, Jocelyn. We quickly packed up and headed to launch the kayaks in nearby Algonkian Park. Jocelyn received her kayak as a birthday gift last month and her birthday wish was that I doodle a 'tattoo' on the side of it to make it even more special. I just love when my children like my work.
Kayak Tattoo
Here is a close-up of the results. She loves it which is the best. In fact, while launching the boats and preparing to take a quick photo for the blog, we met two lovely young girls, one of which asked if she could help with the photos. She turned out to be quite the photographer and snapped five photos before we even had a chance to worry about how we looked. Anyway I finally got it across to her that I was actually there to take a photo of the tattoo. She stopped and then came closer to look, immediately asking me for a card so that she too could have her kayak tattooed. You never know who you are going to meet. Stay tuned another business might be on the horizon.

Friday, May 11, 2012

Doorways & Impress Art Metal Stamps


Impress Art Metal Stamps

When asked if I would like the opportunity to participate in this blog hop I had to take a moment to think about it, it only took a moment and I had a design in mind that would stay true to my design sense and direction. I am fascinated by doorways and am pleased to have come up with a design that features one of the wonderful metal discs from ImpressArt as well as their Ballroom Boogie 3mm alphabet set. the directions provided with the stamps were extremely easy to follow and with just a little practice I was able to achieve a clean stamped image. 
Metal Stamping in Progress

I chose to stamp my current hometown and state onto the disc, creating a keepsake that can be displayed on my Christmas Tree, in a window or on a stand in my living room. My advice when working with the stamps would be to read the directions carefully and make use of the tape to hold the disc securely to the base. A clean on-point strike from the hammer will give you a clear image every time.
Close Up View of Stamped Image

To create your very own doorway you will need the following supplies along with  Impress Art metal stamp supplies.
 Assorted colors of wool blend felt
Steam a Seam fusible web
 Fantasy Film - Aurora
Sewing machine, Iron, Scissors  and basic sewing supplies
Stiff cardboard rectangle slightly smaller than doorway
 Embellishments of your choice; flowers, hanger, keyhole brad etc. 


The instructions are simple. Cut the first rectangle from felt, in the case of this ornament I used the measurement of 3 1/2" x 5" however the choice is totally up to you. Press fusible web to the back of additional colors of  felt and cut  rectangles and or squares using the any measurements you choose. Remove the paper backing from the fusible web and press the felt cut outs onto the first rectangle constructing the doorway architecturally in any way you desire. The window panel is created by fusing Fantasy Film to fusible web, removing the paper backing and then fusing the film to a section of white felt. Once again remove the paper backing from behind the felt and fuse the window panel to the front of the doorway. Note: you will need to use leftover paper backing from the fusible web or a non-stick craft sheet to prevent the film from melting onto your iron. Stitch around each of the felt layers with a accent color of thread using the stitch pattern of your choice. Note: you will be stitching through all layers of felt. Press fusible web to the back of the stitched doorway. Press fusible web to the back of the cardboard rectangle which has been cut app. 1/2" smaller than the finished doorway. Remove the paper backing from the back of the ornament and press the cardboard to the center back. Remove the paper backing from the cardboard and press a section of  felt to the back of doorway. Trim around the finished doorway. Embellish as you desire.
Viola!  

Reminder: This project is part of a bloghop - please continue by clicking on the Designer Connection button along the side of my page to see more great designs. Have Fun and enter the contest for a great giveaway, information is listed below!


To enter the contest, they must go to the following link and follow the directions:  https://www.facebook.com/pages/ImpressArt/155664424487844?sk=app_194975693850063