Sunday, December 4, 2011

A Challenge called 'Sock Monkey'

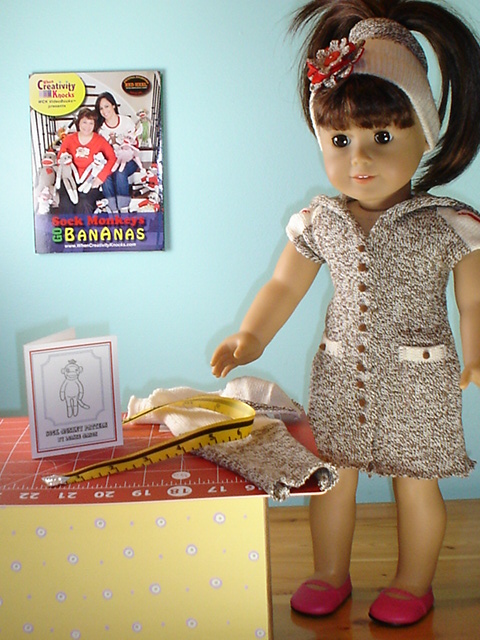
When asked to participate in the 'Sock Monkey Challenge' I was at first perplexed as to a possible design direction. My younger brother, Fred carried around a sock monkey when we were growing up so I was quite familiar with the concept of a monkey made from a work sock but the real challenge would be in putting my creative stamp on the project. And then, it came to me. I recently turned in my fourth manuscript for a doll clothes book and decided this is how I would participate while remaining true to my business plan. May I introduce Millie, she is 18" tall and has a knack for creating sewing projects from just about anything. A red heeled work sock from Fox River was the perfect fabric for her trendy sweater dress and hair band. In this photo Millie is preparing to film 'The sock monkey challenge' for u-tube.


The stage is set and once the lighting is checked the work will begin. We would like to send out a great big Thank You to the folks at When Creativity Knocks, Fox River and Judikins, the wonderful sponsors of filming today.


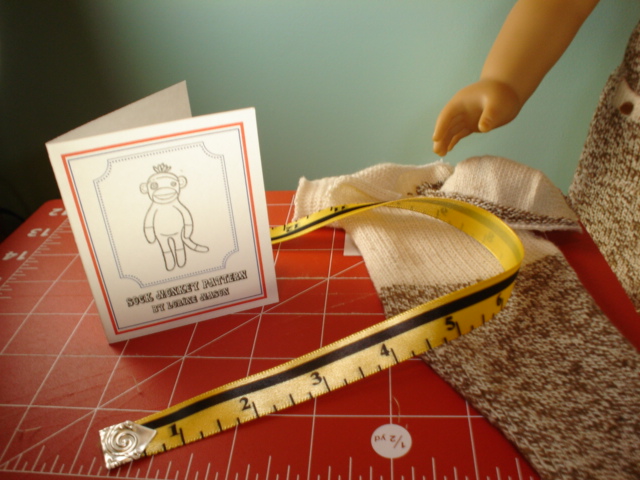
A closeup of the pattern envelope which was inspired by a Judikins stamp along with some of the tools necessary to create your very own sock monkey. If you would like to make a people sized sock monkey for someone you love, check out the video/pattern combination offered by When Creativity Knocks.


Hey Readers: Did you know that you can enter the contest:-Go to http://www.whencreativityknocks.com/ website-In the Member Log in box click: Create An Account-Entry Code: Sock Monkey There is also a discount coupon to purchase the WCK VideoBook: Sock Monkey Goes BanAnas


Please note: Rit Dye provided product for this project however Millie chose to feature their wonderful products in an upcoming post entitled "T Shirts and your Jewelry Box" coming soon on It's Sew Lorine.


Thursday, December 1, 2011

Mason Creation Stamp Set


My good friend who happens to be a very talented designer among other things, created a beautiful card project using a few of my Mason Creation Stamps. Lisa Rojas is her name and I am honored to call her friend. She is referred to as The Stamping Queen and after checking out her blog you will know why. Simply click on her name and you will arrive at the place for creative musings presented by the Queen herself. The project called Home Blessing is being featured on the Crafts n Things website right now. Check it out at : http://www.craftsnthings.com/Projects/BonusProjects/201202/HomeBlessing.pdf

Thursday, November 17, 2011

Creating One of Kind Gifts for Friends and Family

An inexpensive frame - around $5, leftover pieces of fabric and a little sewing. Viola, you have a one of kind gift for someone you treasure. The instructions and inspiration are located in the Sewing Savvy eNewsletter I write for Clotilde.com every three weeks. This particular post will be active on November 16th....check it out and perhaps sign up for future newsletters. It's absolutely FREE! ......

Monday, November 14, 2011

American Patchwork and Quilting Radio


"Lorine Mason, featured guest on American Patchwork and Quilting Radio with Pat Sloan."
Tune in this afternoon November 14th at 4:00 pm est. I willl be talking with Pat and it is always a pleasure as this lady has a sense of humor along with all that talent. I am looking forward to discussing my love of fat quarters of fabric, Boutique Slippers, all those doll clothes books, creating fun projects for publishing and who knows what else. Here is the link to tune in... http://www.allpeoplequilt.com/radio/index.html

Friday, November 11, 2011

Sew Much Comfort - Veteran's Day Sewing Workshop

It was sew simple to convince three members from my local American Sewing Guild to accompany me to a Veteran's Day Sewing Workshop held in nearby Fairfax, Virginia. Seen here are Barb H., Ruth L., and Barbara D. That's me wearing a yellow ribbon.


Our wonderful, Sew Much Comfort instructor and coordinator Lynne T. She was very patient with us as she explained in great detail every step of the process to adapt simple boxer shorts to fit over the bulky medical equipment necessary for the proper healing of broken or missing limbs.


We were all very intent in doing it right so concentration was a must. I think Lynne thought we were good students. Quality is a must and adhering to the proper way - The Sew Much Comfort Way - if you will, was very important.


Here is the entire group of ladies, with me in the middle once again. Oops not the entire group- we are missing one lady - she acted at our quality control person and took the photo. She inspected each pair before they received a label and were ready for delivery to Walter Reed Hospital.


Velcro was generous to donate three boxes of their wonderful product, which is used in each clothing item. As you can imagine we used a lot of Velcro throughout the day. Thanks Velcro - it really made a difference.


We were also helped by Westcott, who donated three pairs of scissors for the event. Having a sharp pair of scissors handy is a must whenever you are sewing and Westcott makes great scissors. Thanks Westcott.


Monday, November 7, 2011

Quick Stitched Ornaments

M is for Mason or Mom or Mary, the choice is really yours to make. This is a quick ornament to make with only felt, stuffing, a hanger and your sewing machine. If you would like the crystal look add some glitter to the finished design. How did I create these adorable ornaments.......


Well let's see, first of all I chose my favorite stitching patterns on my sewing machine and stitched rows spaced app. 1/2 inch apart onto a piece of white wool blend felt. I used a variegated thread for added interest. I then fused Steam a Seam 2 to the back of the stitched piece of felt.

Next I chose a shape for my ornament; a letter created from a font on my computer that I expanded to a suitable size, a cookie cutter, or perhaps something hand drawn.

I traced the 'shape' onto the felt and cut around the image. I removed the paper backing and fused the shape onto a second color of felt which had also been backed with fusible web. I used a scalloped blade scissors to cut around the shape leaving a 1/8 inch border.

I then fused the scalloped edge felt to a final color of felt and trimmed around the edge leaving a 1/8 inch border. I cut a second piece of felt for the backing.

Stitch the two layers together using your machine or a needle and thread and a blanket stitch, being sure to leave a 1 inch opening to stuff the ornament.

Stuff the ornament and sew the opening closed.

Attach a hanger using felt tabs or by sewing it directly to the top of the ornmant. Add a felt rose and leaves to the top of the hanging loop and sprinkle with glitter, if desired.

Enjoy!


Monday, October 31, 2011

Urban Doodles on the Road

Recently I was asked to teach a 1/2 hour class to the ladies at our Northern Virginia American Sewing Guild's annual meeting. I decided my foray into doodling might make a good class and hopefully the ladies would enjoy something different although still sewing related yet very different from traditional sewing based classes. We had a total of 81 ladies sign up for the event. The photo above is the project.


Why you might ask did I call it Urban Doodles...well I probably should have called in Suburban Doodles but that just sounded a little strange at the time. My good friend, Cyndi Hansen designed the logo for me and I love it.... Here I am just getting started.


I showed the project photo and the ladies could be heard collectively saying, I can't draw or doodle what am I supposed to do with this. I reassured them - and moved on with the basics. My wonderful helpers from my local Sew n' Sews group handed out cardboard templates of sewing machines and dress forms and we got started. The ladies traced their choice of outlines and I showed them how to outline the image and then divide it into sections using a ribbon like line.


Here are a couple of examples of pattern fills that a couple of the ladies chose for their design. I started getting a little worried as the room was so darn quiet I thought I had bored them to death. No, I was okay they were all concentrating on their work. I was awed by what I saw. These ladies apparently can draw.


Now this one is fun. The fabric piece underneath the drawn design is an example of doodling with fabric. Whether hand stitched, sewn by machine or simply fused to a backing fabric this is real fun!

Monday, October 24, 2011

Playing with Dolls

It is so funny how things come about. I was with good friend Eileen Hull last week and she mentioned the upcoming 'suitcase' project for the Fresh Vintage bloghop. I had participated the previous week and was not planning on going another round of hopping but since my new book, Love to Dress Up 18" Dolls, was just released and would be the perfect fit for the suitcase, I thought it was a wonderful fit. I decided to dress my doll in the Outdoor Explorer outfit which went perfectly with some Monarch butterfly fabric I already owned in my stash.

Here is how I created my suitcase so full of butterflies, that some seem to be escaping.


Fuse Steam a Seam 2 to the back of your chosen fabric.

Remove paper backing from the fusible web and cover a piece of matboard with the fabric.

Create the magic sandwich: cutting board-die-fabric covered matboard-cutting board. Slide the entire sandwich through the Sizzix machine.

I colored the edges and inside of my suitcase using my Mepxy markers.

I added brads to the corners and a 'lock' shaped brad to the front of the suitcase.

Using the project photo as a guide, create your suitcase.

Use leftovers to create a mini luggage tag, adding some embroidery thread as the hanging loop.

Cut out two Butterflies, once again a great die provided to us by Eileen and Sizzix.

Create wire coils and attach them to the back of the butterflies, attaching the opposite end inside the suitcase using foam tape.

What fun!

Be sure to click on the Hop Forward button on the Fresh Vintage logo at the side of my blog page. Thanks for stopping by.


Wednesday, October 19, 2011

Sizzix Fresh Vintage Blog Hop

Visions of Bali by Lorine Mason


Welcome Hoppers! When Eileen Hull asked me to participate in her current blog hop I was honored as I am not a consistent blogger but a good friend. I want to be, a consistent blogger I mean, as I think I qualify as a good friend despite my lack of blogging skills, but it seems I let life get in my way at times!
My contribution to the blog hop involved the use of the leaf die that Eileen designed within the Fresh Vintage collection as well as some wonderful wire and Katydids from the folks over at Beadalon and a wonderful designer named Katie Hacker. What was I to do with all this great stuff?


The Design Process Step by Step

1. My first love is fabric and I love to fuse things so that is where I started, I simply fused fun batik fabric leftovers to bamboo felt and then slid them through the Sizzix machine cutting out leaves of perfectly predetermined sizes.

1a. Yes, I could have changed the entire design listing process to add a step I forgot but that is just not me so we have 1a. I had to sew something so I 'clothesline' sewed down the center of the leaves using a fun variegated thread on my sewing machine. I then cut apart my leaves and moved to step 2.
Clothesline Sewing: means to sew in a continuous row without breaking your thread, just keep feeding in the next leaf until you are finished.

2. My second love these days is t shirt fabric strips, I rummaged through my design trunk and found a matching strip and used it for the base of the necklace.

3. I love just a touch of sparkle and since I come from all things fabric I filled my Katydid with hot fix metallic rhinestones from iLoveToCreate using glue as frankly it was just a little too delicate to hot fix anything into the channels of the finding.

4. Just so I did not stray too far from my roots I wrapped the wire around a fabric turner tube to create fun coils and then created some spirals to add to the magnificence of my creation.

5. I think I am ready to put it all together. Does this count as a step?

6. Break time: I must get a cup of coffee before I finish.

7. Back to work, I find the center of the t shirt strip and use it to tie five of the leaf stems together with a beautiful knot.

8. I moved up either side of the necklace and continued to tie additional groupings of leaves. Live dangerously and don't measure.

9. I then spiraled the coils around the t shirt strip between the leaf groupings.

10. I added a touch of glue to the back of the Katydid and the spirals made earlier and glued them to the top of the center grouping of leaves.

11. One last look to decide if it looks finished or not! I think it is.....

12. Take a sip of coffee and call the master of all things Fresh Vintage!

13. Be sure to continue hopping - just click on the hop forward button on the Fresh Vintage icon along the side.

14. Thanks for stopping by......


15. Almost forgot -please stop by the Oh My Crafts blog and leave a comment for a chance to win the Leaves die used in this project. Wow! if I did not already have the die I sure would......

Thursday, October 6, 2011

Sew Much Comfort


Sewing our support for the Troops!


We will be adapting much needed clothing for our wounded Warriors at Walter Reed National Medical Center and Bethesda.


Veteran's Day Sewing Workshop


Friday, November 11, 2011


10:00 am to 3 pm


Fairfax Presbeterian Church


10723 Main Street

Fairfax, VA.


If you would like to participate please contact MsLynneTsews@aol.com for more information and to reserve a spot. For deatils about Sew Much Comfort check out http://www.sewmuchcomfort.org/

Wednesday, September 28, 2011

Making a living playing with dolls!

If you would have asked me a few years back if I could possibly make a living writing books about doll clothes, I would have laughed. Yes; it is true that I was one of those children who created clothing for my one doll out of old socks, old clothes, even fashioning a costume made out of leaves and sticks one time but paying bills while playing with fabric and dolls. No way..... It just goes to show that if you can think to imagine it - you can make it happen. Of course designing clothes for dolls is not the only item I work on at a time but my new book brings the total to seven pattern packs and three books on doll clothes. You can imagine I have quite the collection of clothes at this point and with no grandchildren or small children in my life at this moment I am quite the hit with my friend's children. My last Christmas party involved bringing out a box of dolls and a wide variety of clothes and the three youngsters attending the party were totally involved in dressing and undressing the dolls. What a life!


Wednesday, September 21, 2011

Halloween Corseted Cupcakes

Have you ever thought about having your cupcakes wear a corset instead of yourself? Frankly I prefer my cupcake to wear a corset as I find them somewhat confining. Good thing Eileen Hull and the folks over at Sizzix came up with this great Scoreboard die so I could cut out my cupcake corsets in no time at all. We are busy these days but our party treats still need to reflect our personal style. I can't wait to get started on the lastest blog hop with Eileen and the whole crew of talented designers signed up for the Fresh Vintage Blog Hop starting very very soon. Stay tuned!!!!!!!!

Monday, August 15, 2011

Boutique Slippers by Lorine Mason

Here is my latest example of all things possible. As a little girl with a sister a couple of years younger living on a farm we had to improvise our craft supplies. Trust me there was no Michaels or AC Moore down the road and frankly there was no extra money for purchasing fun supplies anyway. This did not stop the creativity in our household. We used things from the yard, recycled items (before recycling was popular) and flour and water for glue. I like to think of myself as a child-like version of MacGyver of the crafting world. Anyway, the point is that we made shoes from cardboard and bailer twine. We carefully traced the outline of our feet onto the cardboard, cut them out and then strung up a version of a farmer flip flop. We decorated them and then proceeded to have a fashion show, laughing ourselves silly each time we had to stop to re-string our footwear. What a memory!


Wednesday, June 22, 2011

Duck Tape ? The new faux leather in the design world


I just finished my challenge project for CHA. I cannot believe I am sewing with duct tape or Duck Tape which is actually the brand name I am using in my latest project. Let's go back a few days and talk about the journey into my Duck Tape sewing project. I wanted to support a fellow designer and decided that I would participate as the design funds were going to be donated to a good cause and hey I like a challenge. Here are the materials I used in the latest project.


Duck Tape - 4 sheets & 1 roll

Velcro Sticky Back dots

Westcott Cutting Tools

T Shirt fabric strips

100% Cotton canvas

Shape 'n Create Bag & Tote Stabilizer


Sew far sew good for now.......

Monday, June 13, 2011

CHA Canadian Designer Challenge

Bird in the Wind by Lorine Mason
Be Inspired is a Canadian Designer Look & Learn event scheduled to be held at the CHA show in Chicago, July 18th, 2011. A total of eight Canadian designers were asked to create a mixed media piece using supplies provided by; DecoArt, Harmonie, Canvas Corp, and last but certainly not least Tsukineko. While each designer was supplied with the same wonderful mix of products the finished projects will showcase the individual designers look and style. Designers will be on hand to discuss their creations with Retailers from around the world at a Look and Learn event at the show. Looking to encourage retailers to recognise Canadian designers and manufacturers, each attendee at the event will not only receive instructions for each project on a CD but an inspiration kit filled with products valued at over $150. Let us inspire you .... to inspire sales.
Pre-registration to attend the CHA Summer Conference and Trade Show is necessary. For additional details go to http://www.chashow.org/
I hope to see you there.

Sew far Sew good,

Lorine

Monday, May 2, 2011

Canvas Hairband


I made this cute hairband the other day as I am in dire need of a haircut and wanted to look like I knew what I was doing with my hair until I could get into see Corey and let him do his magic. Here's how I made it:

Supplies:

Scraps of canvas duck cloth

Scraps of felt

12" length of black 1/8" elastic

Fusible web - I love Steam a Seam2

Puffy Velvet fabric marker by Marvy Uchida in black

Piece of scrap paper to make your pattern

Sewing machine and basic sewing supplies


Getting started:


Wrap a tape measure around your head and measure appx two inches behind your ears. I got 20 inches but I think I have a fairly large head.

Fold your paper in quarters and set it on the table with the center fold on your top right. Using the measurement you came up with previously and measuring out from the center fold of the paper, place a mark at the measurement 1/2 inch down from the top edge. I used 10 inches.

Measure down 1 inch from the top right corner and place a mark. Starting at the fold, draw a curved line to meet the mark on the paper.

Cut along the drawn lines and open up the paper for a full size pattern. Make any adjustments you desire to the pattern. Create your own fun pattern.....

Press fusible web to the back of a piece of canvas duck slightly larger than your pattern. Trace the pattern onto the canvas and cut out using decorative edge scissors.

Remove the paper backing from the fusible web and press the canvas cut out to a slightly larger piece of felt being sure the felt extends 1/2 inch beyond each end of the canvas. Cut out leaving a slight border of felt extending past the canvas except at each end where you should leave 1/2 inch.

Top stitch the two layers together using black thread. (optional)

Now the ART: Use stencils, stamps or your imagination and a pencil to sketch, draw or stamps an image on your hairband. Trace over the lines using the Puffy Velvet fabric marker. Follow the manufacturer's direction to heat the paint once it is dry and watch the magic.

Turn over each of the 1/2 inch ends of felt to the cover the raw edge of the canvas and top stitch close to the cut edge creating a channel for the elastic.

Thread the elastic through both channels on the hairband leaving the ends free. Try the hairband on for fit, pulling the elastic to a comfortable yet snug fit. Stitch elastic ends together and slide the stitched end in behind on channels.

Viola - you have a one of kind hairband....


Friday, April 22, 2011

Butterflies and Spring


I completed my final project from the classes I took at Quilt Market in Hampton Roads, Va this spring. This is quite the accomplishment for me as I have started a lot of projects that remain unfinished in my sewing room. The first class piece was the Daylily I created for my parents a couple of posts back. I am happy to report they have received the piece and it is hanging on their wall at home. When it first arrived in Winnipeg, my sister pinned it to the curtain in my Mother's hospital room and told her that it was not going home until she did. I am happy to report that she did take the quilt home. She is however back in the hospital again. Perhaps that is why I finished this piece come to think of it - maybe I wanted to hang it in my hallway to remind me of the healing power of a quilt. Mom - get well and I will see you soon. Love Lorine

Tuesday, April 5, 2011

Doodling Anyone


I am calling my new passion 'Suburban Doodling with Lorine' and I am totalling addicted it seems. I doodle on scraps of paper - in brand new sketch books - and on fabric. I use pencils, pens and markers - some dirt cheap some more expensive with interchangable nib sizes and refillable compartments. I am into black right now but am not apposed to color sometime in the near future. I recently created a 'Doodle Fabric Flower' project for an upcoming newsletter issue. Check out past issues at http://www.clotilde.com scroll down the left side and click on Sewing Savvy Newsletter under Helpful Tips and Links.


Sew far Sew good,


Lorine

Monday, March 21, 2011

Early Parent's Day gift

I attended a couple of classes recently while down at the Hampton Roads quiltfest and decided this week that I refuse to have yet another unfinished project hanging around my studio staring me down every time I walk through the doors.

The class involved the large daylily you see on the above wallhanging. We used a lot of fusible web and some wonderful batiks which I had brought from home. Participants in the class had the choice of a number of flowers - I chose the daylily as it reminded me of tiger lilies from back home. We used to see them not only in gardens but in the ditches as we travelled along the Trans Canada Highway on the odd vacation we took as children. My father's favourite flower is the tiger lily.
During the class most of us were able to cut out out flowers and place them on the fabrics and few of us quicker ones even managed a few stitches - I believe I got the stamens done. And then class was over and we were take our creations home and finish them with some wonderful instructions given to us by our teacher.

The class was a month or so ago and I of course had done nothing except pile it on top of a number of other projects I have not finished. I however have had a nagging worry about my parents who are aging of course as lets face it what is the alternative, and who are dealing with continual medical problems, could use a 'quilted' hug from their far away daughter.

My hope is that they will hang my creation on their front door and reach out and touch the lily knowing that not too long ago I touched it in exactly the same place.

I am off to mail my hug today - please wish for its speedy delivery.

Sew far sew good,

Lorine

Wednesday, March 16, 2011

Suburban Doodles


I have a new love - it is Suburban Doodles - directly related to Urban Doodles which I debuted at CHA. While Urban Doodles is my canvas accessory line complete with edgy doodle art, Suburban Doodles is a line of art that I have been working on everyday since returning from CHA. I start with images and then let the pen and paper lead me to the art. My hope is to transfer this new-found art to my sewing machine in the near future. While I am not Irish I appreciate a holiday like anyone else so here is my English/German/Canadian/American version of a shamrock......

Wednesday, March 2, 2011

FaveCrafts Blog Radio

Here's Izzy, my daughter Kimbrely's dog. You remember the dog who is going to make me famous for the dog food grocery tote. It is so funny what people remember.
I was a guest on Pat Sloan's FaveCrafts BlogRadio program today. I talked about my recycled sewing projects. Yes - that included the dog food bag as well as the coasters I posted a photo of on my last blog. It was a complete hoot - lots of fun. My only worry is that the listeners were not as entertained as I was during the show. We'll see if I am asked back I guess. Anyway I promised Pat as well as my readers on the Sewing Savvy e-newsletter I would post more recycled sewing projects so I better get busy. If you have a few minutes listen to the show. I am the first guest - don't be alarmed by the advertisement when you first hit the play button - I guess they have to pay the bills somehow - it only takes a moment and then Pat is heard introducing me. Remember I am a novice at this so please be kind.

http://www.favecraftsradio.com

Sew far Sew good,
Lorine

Tuesday, March 1, 2011


I recently returned from the Hampton Roads Quiltfest in Hampton, VA. It was a blast and I was able to take off my teaching hat and put on my student hat for awhile. I signed up for Marjan

Kluepfel's classes on Friday and Saturday. I will post photos as soon as I finish up the projects. Check out Margan's website for a sneak peek at http://www.marjankluepfel.com/


I am hard at work on my next book of 18" doll clothes and must say it is so much fun. I was able to locate the most beautiful fat quarters of fabric for the projects. I completed two outfits yesterday and must now force myself to ignore the pile of fabrics sitting on my design table to focus on writing up the instructions. I certaining do not want to leave that to the end as it is by far the least interesting part of writing a book.


Check this out. On Wednesday I will be a guest of Pat Sloan's FaveCraft's live radio show. We will be discussing my interest in incorporating items from my recycling box into my sewing projects. The photo of the soda can coasters above will be one of our topics. I would love to have you tune in.
favecrafts Radio - Showtime 3:00 est Wednesday March 2
Sew far sew good for now,
Lorine

Monday, January 24, 2011

Heading to CHA in Los Angeles


Here is a peek at my new business poster. I am picking it up from the printers this afternoon and starting the packing process. It is going to be a busy time in LA. I am not only showing in the License and Design section of the show ( Booth 4840) if you are in the area but am teaching a class with good friend and fellow designer, Ann Butler on Effective Communication.
Back to License and Design - I would love to show you the new product lines but that would be cheating so you will have to wait for the big unveiling at the show. The names are: Urban Doodles, Welcome Home and Sew Sweet. Yes, my sewing machine has been extremely busy lately. I will let you know how things go when I get back. Wish me luck, and take care while I am away. Lorine